
How to Snapshot an ElasticSearch Helm Release on GKE


In this tutorial, we will create a snapshot of the ElasticSearch database that has been deployed on Google Kubernetes Engine (GKE). We will then restore the database state using the roll back to a point-in-time snapshot feature.
Before starting with this tutorial, make sure Robin Storage is installed on GKE, and your Elasticsearch database is deployed, has data loaded in it, and the Helm release is registered with Robin.
Creating a snapshot of the Elasticsearch Helm Release
Snapshots allow you to restore your application’s state to a point-in-time. If you make a mistake, such as unintentionally deleting important data, you can simply undo it by restoring a snapshot.
Robin lets you snapshot not just the storage volumes (PVCs) but the entire database application including all its resources such as Pods, StatefulSets, PVCs, Services, ConfigMaps, etc. with a single command. To create a snapshot, run the following command.
robin snapshot create single-user-bob myusers --desc "contains a user named bob" --wait
Now let us verify that we have successfully created the snapshot.
robin snapshot list --app myusers
You should see an output similar to the following. Note the snapshot id, as we will use it in the next command.

We now have a snapshot of our entire database that contains our user named Bob.
Roll back to a point-in-time using snapshot
Let’s simulate a user error by adding an invalid user named “Jo$n” instead of “John” via the command:
kubectl exec -i ${CLIENT_ADDRESS} -- curl -H 'Content-Type: application/json' -XPOST http://localhost:9200/test-index/test/2 -d '{"name":"Jo$n"}'
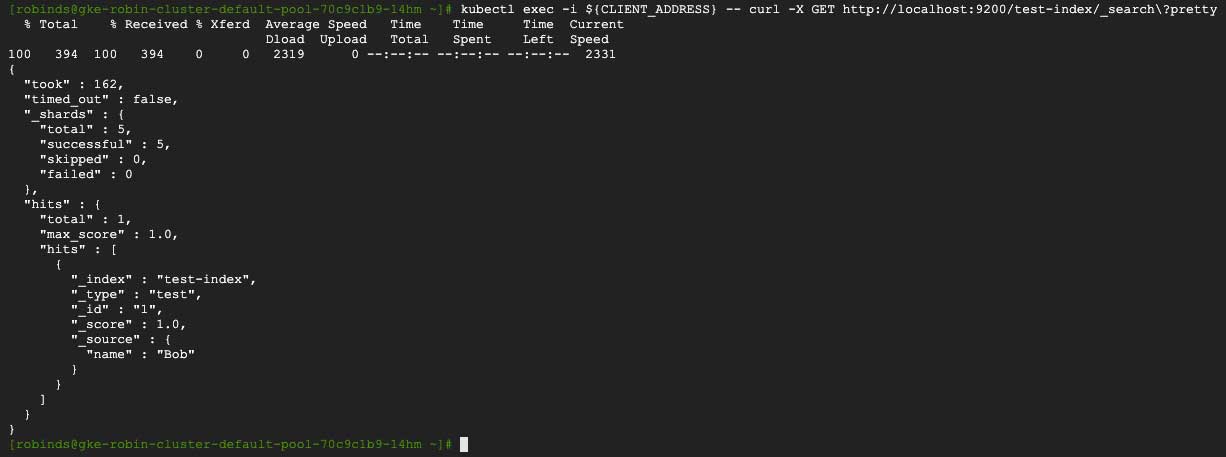
Let us verify the movie titled “Jo$n” has been added by running the following command.
kubectl exec -i ${CLIENT_ADDRESS} -- curl -X GET http://localhost:9200/test-index/_search?pretty
From the output you should see a secondary user named “Jo$n”:

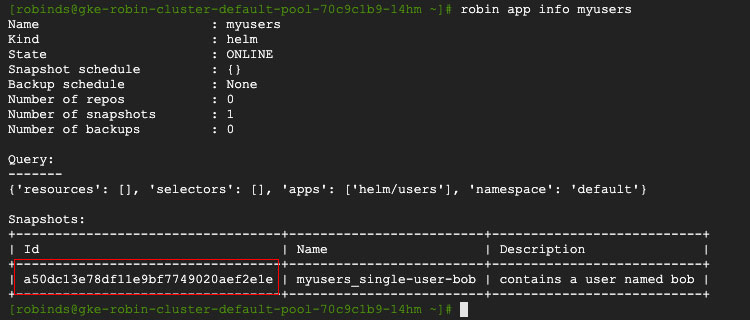
Let us now run the following command to see the available snapshots for our ElasticSearch database.
robin app info myusers
You should see an output similar to the following. Note the snapshot id, as we will use it in the next command.
Now, let us roll back to the point-in-time when we only had one user (‘Bob’) that was valid. To roll back, run the following command using the snapshot id displayed in the above output:
robin app rollback myfilms Your_Snapshot_ID --wait
To verify we have rolled back to 9 movies in the “movies” table, run the following command.
kubectl exec -i ${CLIENT_ADDRESS} — curl -X GET
http://localhost:9200/test-index/_search?pretty
You should see an output similar to the following:
We have successfully rolled back to our original state that contains our valid user “Bob”!
This concludes the Snapshot ElasticSearch on GKE tutorial. We can also clone the entire ElasticSearch database to improve collaboration across Dev/Test/Ops teams.
Deploy ElasticSearch on GKE Tutorial
Clone ElasticSearch on GKE Tutorial